Compressing audio is one of the fundamental steps in audio production, ensuring a consistent audio level and enhancing the overall sound quality throughout the creation. Meanwhile, Audacity is a popular and versatile audio editing program that provides powerful editing tools. In this post, we’ll dive into how to compress an audio file in Audacity. We’ll explore its benefits and fundamentals of compression and learn how to apply compression to your audio files effectively. Whether you’re an expert in audio editing or a novice to this world of audio editing, mastering the compression techniques in Audacity can significantly level up your capabilities in sound production. Thus, let’s embark on this journey of audio optimization and achieve professional-grade output together!

Part 1. Does Audacity Compress an Audio File
Can you really compress audio in Audacity? The answer is yes. Audacity can compress audio files. Furthermore, the compression in this software involves modifying the dynamic range of audio by decreasing the louder sections’ volume while boosting the quieter portion. This procedure creates a more consistent and balanced sound throughout the audio. Audacity offers a devoted compressor effect through the program’s effects menu. Moreover, you can adjust the parameters given, like ratio, threshold, attack, makeup gain, and release, to control the intensity and timing of the compression. Using these features, you can compress your audio files to achieve your target audio dynamics and quality.
Part 2. How to Compress Audio in Audacity
By following the steps below, you can effectively compress audio files in Audacity if you want to enhance the sound quality and achieve your target of a more balanced audio output. Start experimenting with different settings you will find in Audacity by looking at the steps below.
Step 1.You must first download Audacity on your PC by going to its official website and clicking its download button.
Step 2.When the program is installed, launch it and go to the File tab menu, then click the Open button to load the audio file you need to compress. Please note that you can also press the Control O shortcut key on your keyboard to load the file.

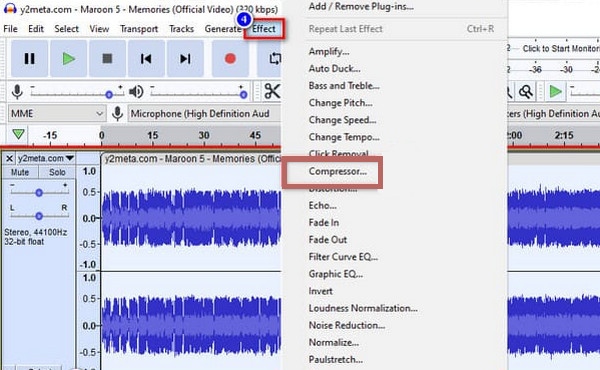
Step 3.After loading the audio file, press the CTRL+A keys on your keyboard to choose the audio you loaded. When the audio you added is highlighted, click the Effect tab and choose the Compressor option among the prompted selections.

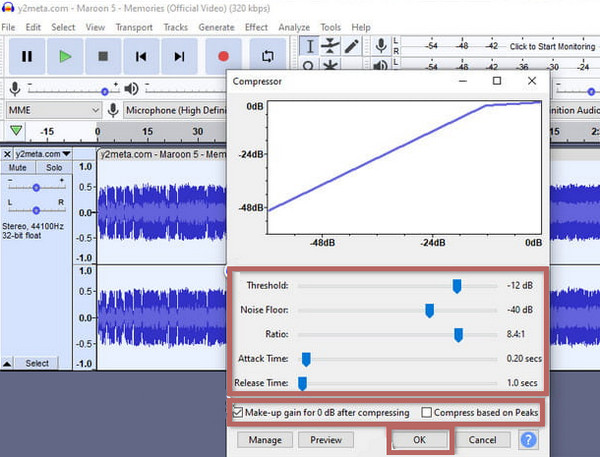
Step 4.After clicking the tab, the compressor window will appear where you can adjust the Noise floor, Ratio, Threshold, Attack time, and Release Time. Adjust the said aspects according to your preferences. Once done, click the OK button to apply the changes.

Step 5.Once done, go to the File tab menu, hit the Export option, and select the audio format you want for your output. And that’s how to compress audio files in Audacity.

Part 3. How to Compress Audio Using an Alternative for Audacity
If the compressing process of Audacity is challenging for you, then here is the best compressor you must use as an alternative: the Video Converter Ultimate. This software does the same job, well, even better for being quick and effective than Audacity, as every user says. Furthermore, this Video Converter Ultimate by Blu-ray Master has a much more intuitive interface and an excellent Audio Compressor tool within its Toolbox that will help you quickly compress all the types of audio files you have on your device. The best thing about using it is that, even though you are a beginner in audio compression, this software will assist you in effectively finishing your compression task in just a few seconds. Thus, learn the quick steps on how to compress audio in Audacity’s alternative by following the tutorial below.

- A multifunctional and multi-platform audio compressor.
- Compress the media files in three easy steps.
- Support for hundreds of formats for input and output.
- Exciting and powerful tools await you.
Free Download
For Windows
Secure Download
Free Download
for macOS
Secure Download
Step 1.Just like Audacity, you will need to install this Video Converter Ultimate by clicking the Download button above.
Step 2.Once the program is installed, open it and go to its Toolbox menu. Then, choose the Audio Compressor tool available among the list of features you see.

Step 3.Once clicked, a new window will appear. From that window, click the + button and locate the audio file you must compress to upload.

Step 4.You may now begin adjusting the audio file size by dragging the slider on the Size section. Also, you can change the file name, format, channel, sample rate, bitrate, and duration if you like. Then, you can hit the Preview button to listen to your pre-output.

Step 5.When all your target adjustments are already set, you may hit the Compress button located at the bottom right part of the interface. You will see that you won’t need to wait long for the compression process to finish as it is infused with an ultra-fast process. Thus, you can now check for your newly compressed audio file.

Tips: After compressing the audio file, you can also use Video Converter Ultimate to remove the audio background noise if you find the output audio pitch unsatisfying.
Part 4. Comparison Table of the Two Audio Compressor
In this section, we will elaborate on the features and aspects of the two compressors to let you see their comparison.
| Features | Audacity | Video Converter Ultimate |
| With Audio Editing Tools | Yes | Yes |
| Supported Audio Formats | FLAC, WAV, MP3, OGG. | FLAC, MP2, AAC, WAV, WMA, MP3, AC3, M4B, AUD, MKA, AIFC, RA AIFF, APE, CAF, MPC, QCP, OGG, M4A, RAM, AU, AIF, CUE. |
| Batch Processing | Yes | Yes |
| Ease of Use | Moderate | Easy |
| Supported Platform | Windows, Mac, and Linux. | Windows and Mac. |
Part 5. FAQs About Audacity Compression
-
What is the compressed effect in Audacity?
The Audacity’s Compressor effect reduces the dynamic range of audio, making loud parts softer and quiet parts louder, resulting in a more consistent audio volume.
-
What is the best setting for a compressor in Audacity?
The best settings for a compressor in Audacity are generally a low ratio of 2:1, moderate threshold, and attack/release times. But you may adjust the settings to suit your specific needs.
-
Should I compress or normalize first in Audacity?
Yes. It is better to normalize before applying the compression in Audacity. This will adjust the audio’s peak levels to a target value, providing a consistent starting point for compression to work effectively.
-
What does compressing audio do?
Compressing audio will minimize the size of the audio while making it more dynamic range.
Wrapping up
This article teaches how to compress audio Audacity using detailed instructions to follow. Also, the best alternative is presented to give you another option for compression. So, if you find the Audacity not flexible enough for your needs, switch to Video Converter Ultimate.
More from Blu-ray Master
- How to Compress Video for Vimeo with Best Quality 2024
- How to Compress a Video on Android: Best Guides to Follow
- 100% Working Methods to Compress a Video File for Facebook Post
- Best Ways to Reduce WMV Movie Sizes Free Online and on Desktop
- Best Ways to Compress WebM Videos for Free/with Best Quality
- How to Compress MPEG/MPEG-4 Video without Any Hassle


