Jun 27, 2024Posted by Brittany Garcia to Edit Video
In the field of video editing, there are various tools to use that may help you enhance your videos. The reverse effect is one of the best video effects that can make your video unique and attractive. In this review, we will introduce the DaVinci Resolve software as an effective video reverser to operate. We will share our own experiences and findings about the program’s capabilities. Also, in the last part of this review, we will introduce another useful program that may help you reverse a video smoothly and effectively. With all of that, be an amazing editor after reading this DaVinci Resolve reverse clip review.
- Part 1. What is Video Reverse
- Part 2. How to Reverse A Clip in DaVinci Resolve
- Part 3. Summary for Using DaVinci Resolve
- Part 4. Reverse A Clip Using DaVinci Resolve’s Alternative
- Part 5. FAQs about Reverse A Video Using DaVinci Resolve
Part 1. What is Video Reverse
Video reverse is one of the video effects you can use in various video editing software. This effect can play an important role in terms of video editing. It can help users make an entertaining video, especially on playing videos backward. It can also show various highlights in a certain scene. Plus, a reverse video effect can help users identify some mistakes in a certain video with a normal speed playback. There are more reasons why you need to reverse a video. It can be for creativity, humor, musicality, understanding complex actions, entertainment, and more. So, if you want to reverse a video, you can do so. All you need is to access excellent and reliable software to achieve your desired final result.
Part 2. How to Reverse A Clip in DaVinci Resolve
DaVinci Resolve is a professional-grade video editing program capable of color grading, visual effects, audio mixing, editing, and more. This powerful software can assist you improve your video in many ways, making it more reliable and a go-to app for professionals. Now, we are going to share with you our experiences with the video reverse function of the program. Well, DaVinci Resolve can offer various methods for reversing a video. These methods are proven and tested so you can obtain your desired outcome after the process. The functions you can use are Reverse Speed, Retime Control, and Speed Change. With these, you can ensure to reverse your video appropriately. However, since we already have experience operating the program, we want you to know that DaVinci Resolve has a steep learning curve. The main layout of the program is bombarded with complicated options and functions, which is confusing and unsuitable for beginners. So, if you are a non-professional user, we recommend that you ask for guidance from skilled users. You can also look for another tool that has the same capability with an easier video-reverse process. You can also use the methods we will offer below, so you can learn how to reverse a video in DaVinci Resolve.
Method 1. Reverse A Video Using the Change Clip Speed Function
Step 1. After you launch the DaVinci Resolve, click the File menu. Then, choose Open to add the video from your computer. Then, add the video from the program’s timeline.
Step 2. After that, navigate to the Edit section. You can find this section from the horizontal menu bar at the bottom interface.
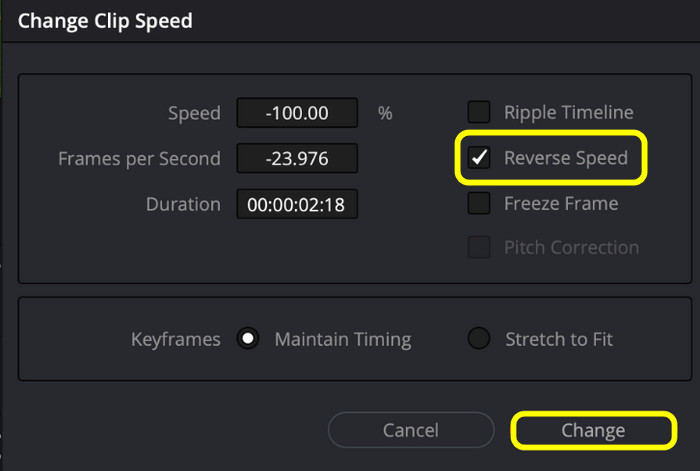
Step 3. Then, from the timeline, right-click the clip, and you will see various options. Select the Change Clip Speed option to open a mini interface. Then, from the Reverse Speed option, check the box. Once done, click Change and you can already play your video in reverse mode.
Method 2. Reverse A Video Using Reverse Segment Function
Step 1. From the program’s main interface, add the video you want to reverse and attach it to the timeline below.
Step 2. From the timeline, right-click the clip and select the Retime Controls function from the options. You can also use the Ctrl+R keys as an alternative.
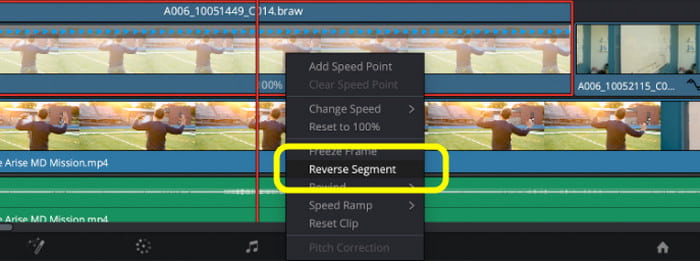
Step 3. Then, there will be a line of triangles on your screen. Also, there will be an arrow pointing down. Click it, and you will see another pop-up menu on the screen. Click the Reverse Segment function. After that, you can already play the video in reverse.
Method 3. Reverse A Video Using Inspector Tool
Step 1. From the Edit page, navigate to the horizontal menu bar from the top right interface. Then, select the Inspector tool. A menu from the right interface will appear after clicking the tool.
Step 2. Proceed to the Video menu and look for the Speed Change option. After that, a few hidden options will appear on the tool’s interface.
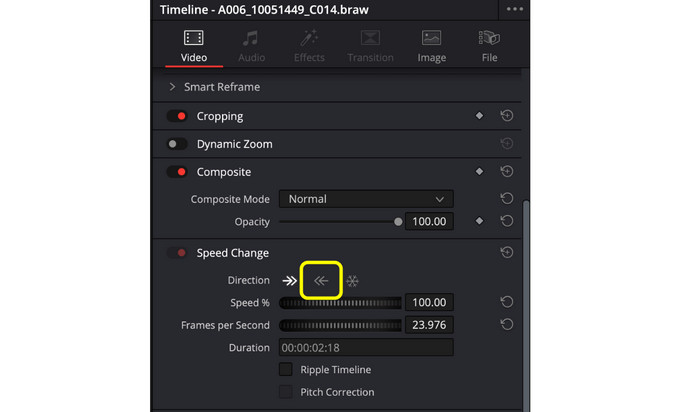
Step 3. From the Direction option, you will see two arrows. Click the arrow pointing to the left. The left-pointing arrow is a function that helps you reverse a video. With that, you can play the video in reverse after clicking the arrow.
Part 3. Summary for Using DaVinci Resolve
As our final verdict, DaVinci Resolve is one of the most reliable editing software for reversing a video. It can also offer three methods to ensure that you can reverse a video effectively. What’s more, it can also provide more advanced editing features. It includes color grading, audio mixing, video editing and cropping, and more. However, the software also has a steep learning curve. It has various sections, options, and features that may confuse beginners during the operation. Also, we found out that accessing the software is time-consuming. You must create an account first before getting it on your computer.
Pros
- It can reverse a video using three methods.
- Reversing a video won’t affect the video quality.
- It can also offer various editing functions, such as color grading, mixing audio, and more.
- It is accessible on both Mac and Windows.
Cons
- Reversing a video might be complicated with its confusing functions.
- The interface is unsuitable for beginners since it has a steep learning curve.
- Accessing the software is time-consuming.
Part 4. Reverse A Clip Using DaVinci Resolve’s Alternative
If you think that DaVinci Resolve is not a suitable video editor for you, then use Video Converter Ultimate. After utilizing the software, we can assure you that it is the best and easiest program to use for reversing a video. Its interface is amazing since it is simple and understandable. It can also reverse a video automatically after inserting it into the Video Reverser function. Additionally, what we like here is that you don’t have to create an account to access the program. All you need is to visit the main website and click the Download button. With that, reversing a video using Video Converter Ultimate is more perfect and ideal than using DaVinci Resolve. So, if you want to learn the easier process of reversing a video, see the simple instructions below.
Step 1. Access the Video Converter Ultimate by hitting the Download buttons below. You can get it on Windows and Mac computers. Run it after the installation.
Free Download
For Windows
Secure Download
Free Download
for macOS
Secure Download
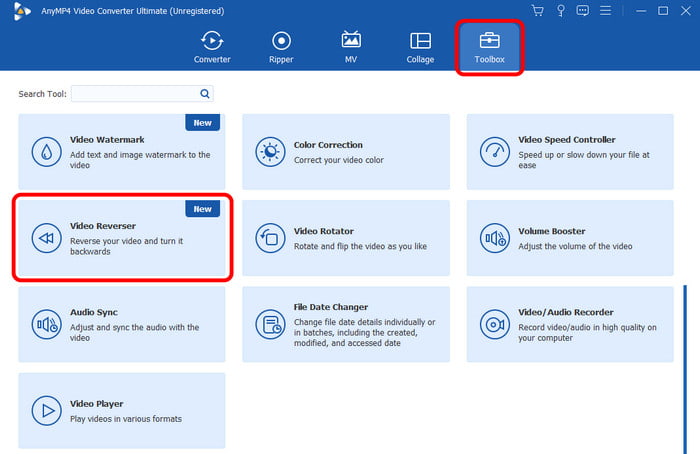
Step 2. Afterward, navigate to the Toolbox section and look out for the Video Reverser function. Then, another interface will pop up on your screen.
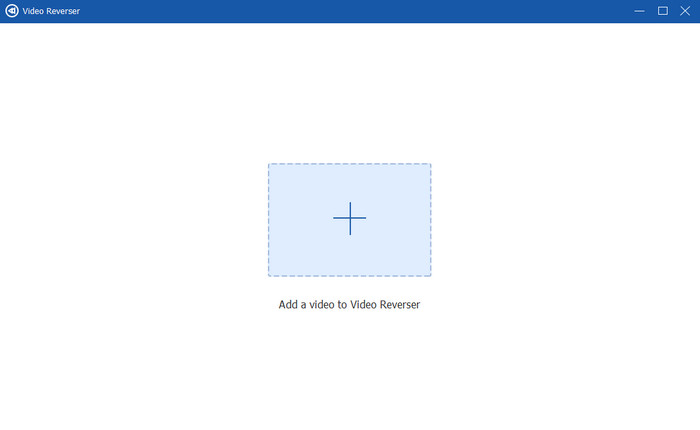
Step 3. Click Plus to add the video from your computer that you want to reverse.
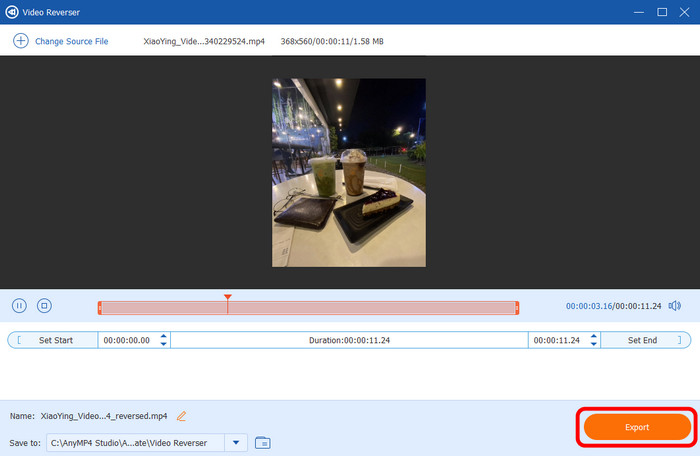
Step 4. Then, you can try playing the video in reverse by clicking the play button. To save the final video, press Export and wait for the exporting process.
Part 5. FAQs about Reverse A Video Using DaVinci Resolve
-
Is there an app that can reverse a video?
Yes, there is. If you want to reverse a video, you can use various apps, such as InShot, CapCut, Video Reverse, and more. All you need is to launch the app, insert the video and look for the video reverse function. With that, you can reverse a video and get your desired output.
-
Can you reverse mirror a video?
Definitely, yes. To reverse a mirror video, you must use amazing video editing software. You can use DaVinci Resolve or Video Converter Ultimate to achieve your final video. With their video reverse function, getting the expected result is possible.
-
How do you reverse an action in DaVinci Resolve?
To reverse an action or video, you can get various methods using the program. You can try adding your video and navigate to the Edit page. Then, add the video to the timeline and right-click it. After that, select the Change Clip Speed and check the box from the Reverse Speed option. Once done, you can already play the video in reverse.
Wrapping up
The review tells you how helpful it is to use the DanVinci Resolve reverse clip function to reverse a video. You also learned the various methods, pros, and cons. With that, we can tell that you have learned a lot about the discussion. Also, since the program has a steep learning curve, we can’t hide the fact that it is unsuitable for beginners. If so, the best alternative to use is Video Converter Ultimate. It can offer an easier interface and simple process of reversing a video, which is more ideal for all users.
More from Blu-ray Master
- Kapwing Reverse Video Feature: The Tool for Video Rewind
- Learn How to Reverse a Video with the Top-Tier Tools
- Top 8 Video Reversers for All Platforms and Devices
- How to Reverse a Video on Instagram: Easy and Effective Ways
- How to Reverse a Video Using Snapchat [Detailed Steps]
- Speed-Up Videos on DaVinci Resolve Speed-Up Clip Feature