One of the main issues that content creators face is that their audio becomes out of sync with the rest of the stream over time on social media networking sites. For instance, your mic audio may initially sync up with your lips, but after a few minutes, there will be a conspicuous offset from the video. Fortunately, most audio sync issues in OBS are caused by a sample rate imbalance. Learn how to fix OBS audio delay by reading today’s article.
Part 1. Reason for OBS Audio Delay
As a general rule, the video takes significantly longer to complete and encrypt within OBS than audio. This can lead to the audio playing ahead of or behind the video on occasion, giving rise to a frustrating delay that makes the watching experience a little inconvenient for some viewers. A computer’s inability to complete this process, as with most technical problems, can be attributed to various factors. One area to check for is whether all of the sound devices on your system are set to either 48 or 44.1 kHz, which seem to be the two sample rates that OBS supports. Find out what sample rate you’re using in the Audio Settings section of OBS and double-check that everything else matches up in the sound settings panel on your computer.
Part 2.How to Convert DAV to MP4 with Command Line
1. Check the Sound Setting
This problem can be resolved by making sure every single sound device on your system is set to either 48 kHz or 44.1 kHz, which are the two sample rates that OBS Studio claims to support. Here are the methods to fix it.
Step 1.Select the Settings button in OBS Studio.
Step 2.To open the Audio Settings window, click on Audio. You must first access audio settings to determine the sample rate your sources must be adjusted.
Step 3.Check the chosen sample rate. If you have an old audio device connected, you may need to change this value to 44.1 kHz. Alternatively, it is acceptable to leave the frequency at 48 kHz.
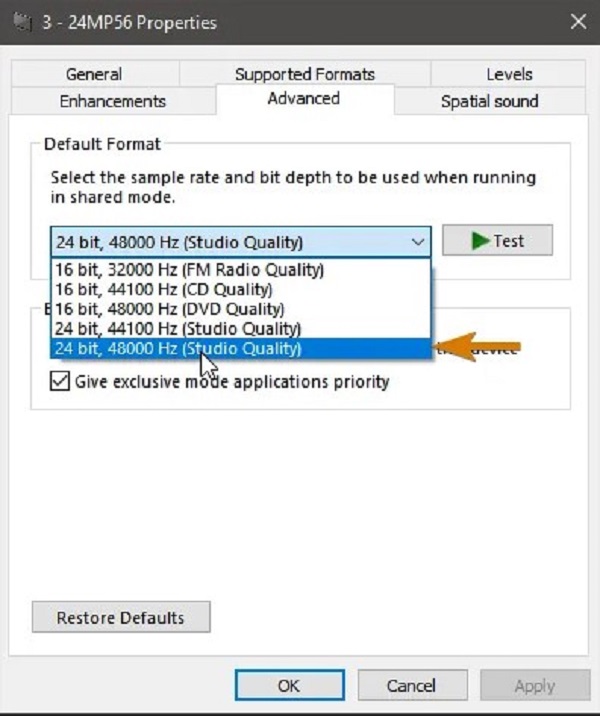
Step 4.Locate the Sound Setting on Windows 10. Hit the Sound Control Panel > Properties. Next, hit the Advanced tab and ensure that all of your devices are set to the same sample rate as you did in Step 3.
Step 5.Finally, choose the highest variant of Hz that corresponds to the sample rate setting on your OBS.
2. Fix the Issue Using the Advanced Audio Properties on Windows
If you are using an external microphone, there may be a lag in the audio when it is being watched on channels. OBS can compensate for this by including a delay during the encoding process. Here is the way to do so to fix OBS audio out of sync.
Step 1.On the OBS Audio mixer, select your audio source by clicking on the gear icon next to it.
Step 2.Hit Advanced Audio Properties. Increase the negative offset of your audio source (500ms = 0.5 seconds). A negative balance will correct the issue with delayed audio.

3. Improve the Audio Delay using Sync Offset on Mac
In some cases, it is a must to add an audio delay to sync the video from a camera with the audio from a mic. It’s pretty simple actually to do, but the choice to add an audio delay isn’t prominently displayed in OBS. Let us know the methods by following the steps below.
Step 1.Insert an audio source or a microphone into your project.
Step 2.elect an audio source by clicking on the cog next to it in the mixer.
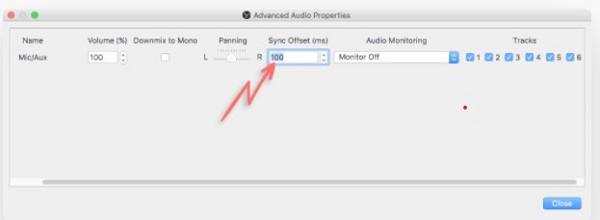
Next, specify the length of time that the audio will be delayed. Enter a delay for the audio source in milliseconds under the audio mixer’s Sync Offset (ms) column. One second is equal to 1000 milliseconds. This option may require trial and error before the audio and video are appropriately synced together.
Part 3.Best Way to Fix OBS Audio Out of Sync
Video Converter Ultimate comes in handy if there is the best way to fix out-of-sync audio. It has an audio sync feature that will improve your audio issues permanently. You can set a delay on your audio feed by 10 seconds. Otherwise, you can also fast-forward the audio while maintaining its quality. Additionally, you can increase its volume by 200 percent. What’s more compelling to this tool, it has a straightforward interface. It doesn’t matter if you are new to editing because you still easily pull off editing just like a pro while using Video Converter Ultimate. So much with that, here are the simple steps to follow to fix audio out of sync.
Key Features
- Use the included volume booster, video trimmer, video reverser, video rotator, video speed controller, and video merger features to make modifications to your media files.
- Rip video to FLV, MP4, M4V, MOV, WMV, and other formats.
- The exported files can be played on a wide range of operating systems.
- Create animated GIFs, watch videos, and compress video files.
Free Download
For Windows
Secure Download
Free Download
for macOS
Secure Download
Step 1.Download the tool
To begin, download the audio sync tool by hitting the download buttons above. Otherwise, you can visit the official page of Video Converter Ultimate, download, and launch the tool on your desktop. Next, go to Toolbox > Audio Sync.
Step 2.Upload the audio file
After which, import the out-of-sync audio by hitting the Plus (+) button. You can drag and drop the file for a faster upload.
Step 3.Fix the out of sync audio
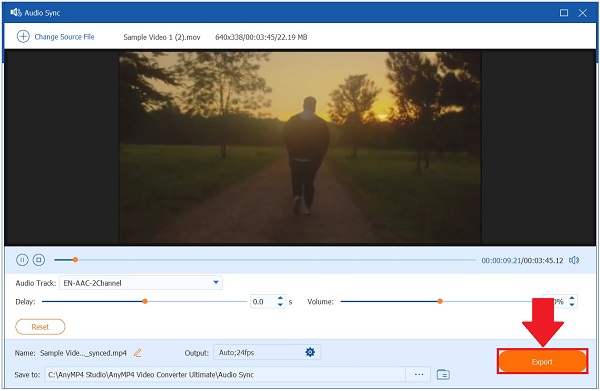
After uploading the file, it is now time to resolve the audio and video sync issues. Use your cursor to move it from left to right based on how quick or delayed you want your audio to be.
Note: If you want to enhance the volume of your audio, you can put the desired volume percentage on the Volume Booster Percentage on the right corner of the screen.
Step 4.Rename the output
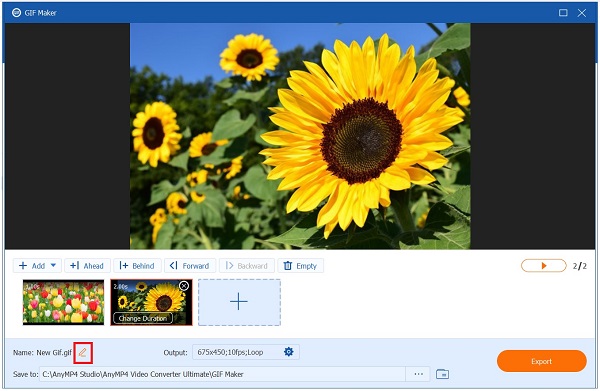
Next, rename the audio output by selecting the Pen button on the bottom left part of the interface.
Step 5.Wait for the rendering process
After that, export the file by hitting the Export button. Wait for the conversion to finish.
Step 6.Preview the file
Finally, view the output on the file folder destination. Now, your audio is not out of sync anymore.
Further Reading:
Add Audio to Video with 3 Video and Audio Merger Tools
[Detailed Steps] How to Convert OGG to MP4 to Play on All Devices
Part 4.FAQs of OBS Audio Delay
-
Is it possible to record the last 5 minutes with OBS?
The estimator can only give you a rough idea of the approximated RAM usage of your default setup. OBS will have to write the buffer to disk if you run out of RAM, which is not the most efficient solution. Five minutes or even a little longer should be no issue for most people in most situations.
-
Is 8GB of RAM sufficient for OBS?
Yes. You will not give the best video content quality with only 8GB of RAM, but this amount of memory should be sufficient to stream some relatively low gameplay quite comfortably.
-
Where can I find recorded videos in OBS?
OBS automatically saves outputs to your Video folder, which is located in the primary documents section of your computer. Clicking on File > Show Recordings will take you directly to this location the fastest. Hit Settings from the drop-down menu at the bottom right, then the Output tab, followed by the Recording tab.
Wrapping up
Now you know the main reason why OBS audio is out of sync, how to troubleshoot when the OBS audio is out of sync, and the best way to fix audio out of sync. Video Converter Ultimate is your best buddy on your out-of-sync audio issues. What are you waiting for? Install it now and be amazed at how it can permanently fix your audio out of sync.


